
How to Relieve Sore Feet: Effective Remedies for Comfort
Foot pain shows up for nearly 8 out of 10 adults at some point and it can turn simple walks into a chore. Most people expect the fix to be complicated or to require expensive products. Turns out, the real secret is a series of small, careful actions you do right at home, and almost all relief begins with something as basic as a five-minute daily inspection.
Table of Contents
- Step 1: Assess Your Current Foot Condition
- Step 2: Prepare a Comfortable Soaking Solution
- Step 3: Soak Your Feet for Maximum Relief
- Step 4: Perform Gentle Stretching and Exercises
- Step 5: Elevate Your Feet to Reduce Swelling
- Step 6: Use Compression Therapy for Enhanced Support
Quick Summary
| Key Point | Explanation |
|---|---|
| 1. Assess Your Foot Condition First | Thoroughly evaluate your feet for pain sources before seeking solutions to ensure effective treatment. |
| 2. Prepare an Effective Foot Soak | Use warm, not hot, water with therapeutic additives like Epsom salt for optimal relaxation and relief. |
| 3. Follow Up with Gentle Stretching | Perform controlled stretches post-soak to enhance flexibility and prevent future discomfort in your feet. |
| 4. Elevate Feet for Swelling Relief | Keep your feet above heart level to reduce swelling; aim for 15 minutes, several times a day. |
| 5. Incorporate Compression Therapy | Wear compression stockings to boost circulation and aid recovery during daily activities, ensuring comfort and support. |
Step 1: Assess Your Current Foot Condition
Understanding the specific condition of your feet is crucial in developing an effective strategy for relief and comfort. Before diving into remedies, you need a comprehensive evaluation of what might be causing your foot discomfort. This initial assessment will help you pinpoint the exact sources of pain and determine the most appropriate treatment approach.
Begin by conducting a thorough visual and physical examination of your feet. Look for signs of inflammation, redness, swelling, or unusual skin texture. Run your hands carefully over each foot, checking for tender areas, unusual bumps, or regions of increased heat that might indicate underlying issues. Pay special attention to areas between your toes and the soles of your feet, as these regions often harbor hidden sources of discomfort.
Learn more about preventing foot complications by understanding the warning signs early. According to research from the American Heart Association, daily foot inspections can help you catch potential problems before they escalate.
Consider documenting your findings through a quick sketch or photograph. Note any specific pain locations, the intensity of discomfort, and any patterns you observe. Is the pain worse in the morning? Does it intensify after standing for long periods? Are certain shoes triggering more significant discomfort? These observations will be invaluable when developing a targeted relief strategy.
If you notice persistent swelling, sharp pain, discoloration, or any signs of infection such as open wounds or unusual skin changes, consult a healthcare professional. Some foot conditions require specialized medical attention and cannot be resolved through home remedies alone. Your assessment should provide a clear picture of whether you can proceed with self-care techniques or need professional medical intervention.
Step 2: Prepare a Comfortable Soaking Solution
Creating the perfect foot soak is an art that combines therapeutic ingredients with careful temperature management to provide maximum relief for sore, tired feet. The right soaking solution can transform your foot care routine from a simple rinse to a deeply healing experience that addresses multiple sources of discomfort.
Select a container large enough to comfortably accommodate both feet, ensuring you can fully submerge them without cramping or awkward positioning. A wide basin or dedicated foot bath works best, allowing your feet to relax completely. The water temperature is critical: aim for warm but not hot water, typically between 92 and 100 degrees Fahrenheit. Water that is too hot can increase inflammation, while water that is too cool will not provide the therapeutic benefits you seek.
Explore our guide on managing foot discomfort to understand comprehensive foot care strategies. According to the Epsom Salt Council, dissolving approximately ½ cup of Epsom salt into a gallon of lukewarm water can significantly enhance your soaking experience. Epsom salt helps reduce muscle tension, decrease swelling, and soften rough skin, making it an ideal addition to your foot care routine.
Consider incorporating additional healing ingredients based on your specific foot condition. For general soreness, Epsom salt works wonderfully. If you’re battling fungal concerns, a splash of apple cider vinegar can provide antimicrobial benefits. Those with extremely dry skin might benefit from a few drops of olive or coconut oil to provide extra moisturization. Avoid using harsh chemicals or excessive additives that might irritate sensitive skin.
Once your solution is prepared, soak your feet for 15 to 20 minutes, allowing the warm water and therapeutic ingredients to penetrate and soothe tired muscles. Pay attention to how your feet feel during the soak. The water should feel comforting, never painful or uncomfortably hot. After soaking, gently pat your feet dry with a soft towel, avoiding vigorous rubbing that might cause additional irritation.
Below is a table summarizing essential materials and their purposes for preparing an effective foot soak at home.
| Material | Quantity/Specification | Purpose |
|---|---|---|
| Warm water | 92-100°F; enough to submerge | Main medium for soaking, relaxes muscles |
| Epsom salt | 1/2 cup per gallon of water | Reduces muscle tension, decreases swelling, softens skin |
| Wide basin/foot bath | Large enough for both feet | Allows comfortable soaking without cramping |
| Apple cider vinegar | Splash (if needed) | Adds antimicrobial benefits for fungal issues |
| Olive or coconut oil | Few drops (if needed) | Provides extra moisturization for dry skin |
| Soft towel | 1 per session | For gently drying feet after the soak |

Step 3: Soak Your Feet for Maximum Relief
The art of foot soaking goes beyond simply submerging your feet in water. It is a deliberate therapeutic process designed to alleviate pain, reduce inflammation, and provide comprehensive healing for tired, stressed feet. Your carefully prepared soaking solution now becomes the medium through which profound relief can be achieved.
Position yourself comfortably with your feet fully submerged in the prepared solution, ensuring the water covers your feet up to the ankles. Create a relaxing environment by finding a quiet space where you can remain seated without interruption for the duration of the soak. If possible, elevate your feet slightly on a cushioned surface to enhance circulation and maximize the therapeutic benefits of the soak.
Explore additional techniques for foot recovery to complement your soaking routine. According to the Epsom Salt Council, maintaining the soak for 15 to 20 minutes allows the therapeutic ingredients to penetrate deeply into the skin and muscle tissue, providing optimal relief.
While soaking, engage in gentle foot mobility exercises to enhance the therapeutic effect. Slowly rotate your ankles, flex and point your toes, and perform gentle stretching movements that do not cause discomfort. These subtle movements help improve blood circulation, reduce muscle tension, and distribute the healing properties of your soaking solution more effectively throughout your feet.
Pay close attention to how your feet feel during the soak. The water should maintain a consistently comfortable temperature. If you experience any sharp pain, tingling sensations, or increased discomfort, reduce soaking time or adjust the water temperature. Some individuals might find relief from alternating between warm and slightly cooler water, which can help stimulate circulation and reduce inflammation. After completing the soak, gently pat your feet dry with a soft, clean towel, avoiding harsh rubbing that could irritate sensitive skin. Your feet should feel noticeably more relaxed, with reduced tension and a sense of overall comfort.
Step 4: Perform Gentle Stretching and Exercises
After your soothing foot soak, gentle stretching becomes a critical component in relieving foot soreness and preventing future discomfort. These targeted exercises help restore flexibility, improve circulation, and release muscular tension that accumulates from daily stress and activity. The goal is to create a series of controlled, smooth movements that gradually restore your feet’s natural range of motion without causing additional strain.
Start with seated stretches that allow maximum control and minimal pressure. Begin by extending one leg forward and using a towel or resistance band to gently pull your toes toward your body, creating a controlled stretch along the plantar fascia. Hold this position for 15 to 20 seconds, feeling a mild tension but never sharp pain. Repeat on the opposite foot, alternating between sides to ensure balanced stretching.
Discover comprehensive leg and foot support techniques to enhance your recovery process. According to research published in the Journal of Physical Therapy Science, targeted foot-specific exercises can significantly reduce pain and improve overall foot function.
Progress to more dynamic movements by performing toe curls and spreads. While seated, place a small towel on the floor and use your toes to scrunch and pull the towel toward you, engaging the smaller muscles in your feet. This exercise helps strengthen the intrinsic foot muscles and improves flexibility. Follow this with ankle rotations, moving your foot in slow, controlled circles both clockwise and counterclockwise to restore joint mobility and reduce stiffness.
Listen to your body throughout these exercises. Stretching should feel like a gentle, progressive release of tension, not a painful ordeal. If you experience sharp or intense pain, immediately stop and modify the movement. Some mild discomfort is normal, but persistent pain signals that you should consult a healthcare professional. After completing your stretching routine, your feet should feel more relaxed, with increased flexibility and reduced tension.
Take a moment to assess how your feet feel, noting any improvements in comfort and mobility.
The following table provides an overview of gentle foot exercises and stretches from the article, including their purpose and how to perform them for maximum relief.
| Exercise | Method Description | Purpose |
|---|---|---|
| Seated towel stretch | Extend leg, use towel/resistance band to pull toes toward body | Stretches plantar fascia, increases flexibility |
| Toe curls | Scrunch and pull towel toward you with toes while seated | Strengthens intrinsic foot muscles, improves mobility |
| Toe spreads | Spread toes apart and hold briefly | Enhances flexibility and relieves tightness |
| Ankle rotations | Rotate ankles in circles, both directions | Restores joint mobility, reduces stiffness |
| Gentle point/flex | Point and flex toes while seated | Increases circulation and releases muscle tension |
Step 5: Elevate Your Feet to Reduce Swelling
Elevation is a powerful yet simple technique that can dramatically reduce foot and ankle swelling, providing immediate relief and promoting faster recovery. By strategically positioning your feet above heart level, you harness gravity to encourage fluid drainage and decrease inflammation that accumulates from prolonged standing, walking, or underlying medical conditions.
Select a comfortable location with adequate support for your elevation strategy. A bed or recliner works best, allowing you to create an optimal angle that promotes efficient circulation. Use pillows or a specialized leg wedge to prop your feet, ensuring they are positioned approximately 6 inches higher than your heart. This elevation angle is crucial for maximizing the therapeutic benefits and reducing venous pressure that contributes to swelling.
Explore comprehensive strategies for managing leg swelling to complement your recovery process. According to MedlinePlus, you should aim to elevate your feet 3 to 4 times daily for 5 to 15 minutes per session, creating a consistent approach to reducing inflammation.
While elevating your feet, incorporate gentle movements to enhance circulation. Slowly rotate your ankles, flex and point your toes, and perform subtle stretching motions that do not strain your muscles. These micro-movements help stimulate blood flow and prevent stiffness during your elevation period. Wear comfortable, loose clothing that does not constrict circulation, allowing maximum blood flow and reducing additional pressure on swollen areas.
Pay attention to how your feet feel during and after elevation. The swelling should gradually decrease, and you should experience a sense of lightness and reduced tension. If you notice persistent or increasing swelling, unusual discoloration, or experience pain, consult a healthcare professional. Your elevation session should conclude with your feet feeling refreshed, less puffy, and more comfortable, signaling that the technique has successfully supported your body’s natural healing process.
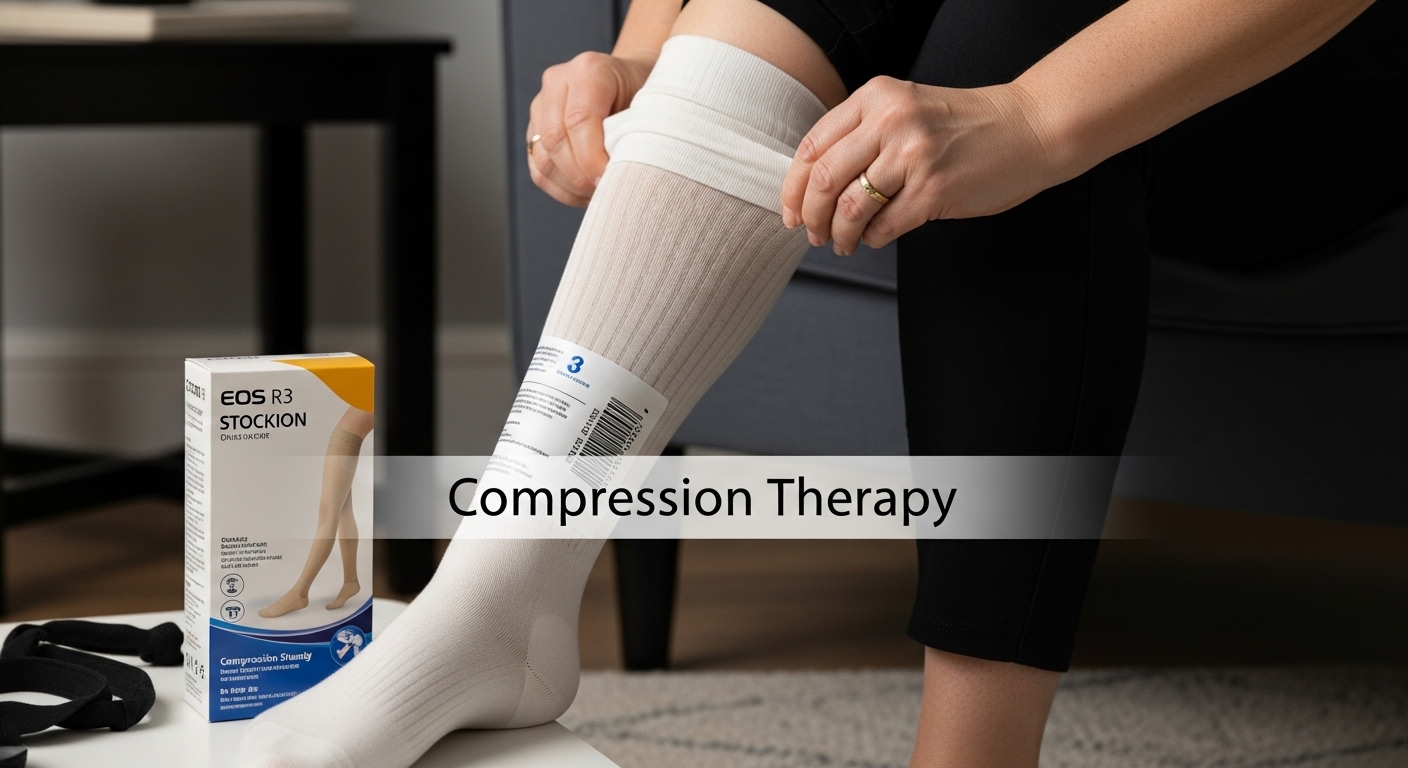
Step 6: Use Compression Therapy for Enhanced Support
Compression therapy transforms how we approach foot and leg recovery, providing targeted support that goes beyond traditional rest and elevation techniques. By applying gentle, consistent pressure to your lower extremities, compression garments help improve blood circulation, reduce swelling, and accelerate the healing process for sore, tired feet.
Select compression stockings with the appropriate pressure gradient that matches your specific needs. For most individuals experiencing general foot soreness, a moderate 15-20 mmHg compression level works effectively. When putting on compression stockings, ensure they are smooth against your skin without wrinkles or bunching, which could create uncomfortable pressure points. Start by gathering the stocking from the top, sliding your foot in carefully and gradually pulling the garment up your leg with smooth, consistent movements.
Learn more about selecting the right compression therapy to optimize your recovery strategy. According to the Cleveland Clinic, compression therapy helps increase blood circulation and reduce swelling in the lower legs and feet.
Wear your compression stockings during daytime activities, particularly if you spend extended periods standing or sitting. They work best when applied in the morning before significant swelling occurs and can be worn throughout the day. Pay attention to how your feet and legs feel while wearing the compression garments. They should feel supportive and comfortable, not painfully tight or restrictive. If you experience increased pain, tingling, or numbness, remove the stockings and consult a healthcare professional.
By the end of your compression therapy session, your feet should feel more supported, with reduced swelling and increased comfort. The garments help promote better circulation, which can significantly alleviate soreness and prevent future discomfort. Take a moment to assess how your feet feel after wearing the compression stockings, noting any improvements in pain levels, swelling reduction, and overall comfort.
Find Lasting Comfort for Sore Feet with Professional Compression Support
Are you tired of living with daily foot pain, swelling, or that heavy feeling after long hours on your feet? The steps you just explored—regular self-assessment, soothing soaks, gentle stretching, and elevation—are the foundation for relief. But when symptoms linger or your goal is reliable, everyday comfort, it is time to consider how medical-grade compression can multiply your results. Compression therapy directly tackles stubborn soreness, swelling, and fatigue by improving circulation and giving your feet targeted support where it matters most.
At Fit Stockings, we specialize in solutions tailored for foot and leg relief. Our selection of trusted brands offers various compression levels, styles, and sizes to match your needs—whether you are dealing with everyday tiredness, varicose veins, or more advanced circulatory challenges. Take the next step for your well-being. Explore our curated range and find the compression stockings right for your recovery. Need advice on choosing or measuring for the best fit? Visit our resources for clear guidance and practical tips. Do not let sore feet slow you down. Start your journey toward greater comfort and confidence today at Fit Stockings.
Frequently Asked Questions
How can I assess my current foot condition?
Begin by visually and physically examining your feet for signs of inflammation, swelling, or tenderness. Document any areas of pain and note patterns related to discomfort, such as pain occurring after prolonged standing.
What is the ideal temperature for a foot soak?
The ideal temperature for a foot soak is between 92 and 100 degrees Fahrenheit. It should be warm enough to provide comfort, but not hot, as hot water can increase inflammation.
How long should I soak my feet for maximum relief?
Soak your feet for 15 to 20 minutes to allow the therapeutic ingredients to penetrate the skin and muscle tissue effectively, providing optimal relief from soreness and discomfort.
What types of exercises can I perform after soaking my feet?
After soaking, perform gentle stretches and mobility exercises like ankle rotations, toe curls, and using a towel to stretch the plantar fascia. Ensure movements are smooth and never cause sharp pain.